
Ahhh Anchor Charts. The bane of any teacher’s existence. Until I became a teacher, I had no idea what an “anchor chart” even was, but now I have to admit I absolutely love them. Well, most of the time. You could say it’s a complicated relationship.
Anchor charts are one of those things that you either seem to love or hate. I think a lot of this has to do with your approach to them however. They can make your life easier in the long run and help your students to understand complex subjects as well. In this post, I’m going to go over how to make an anchor chart, what supplies you need, what makes a good anchor chart, and give plenty of examples as well.
What is an Anchor Chart?
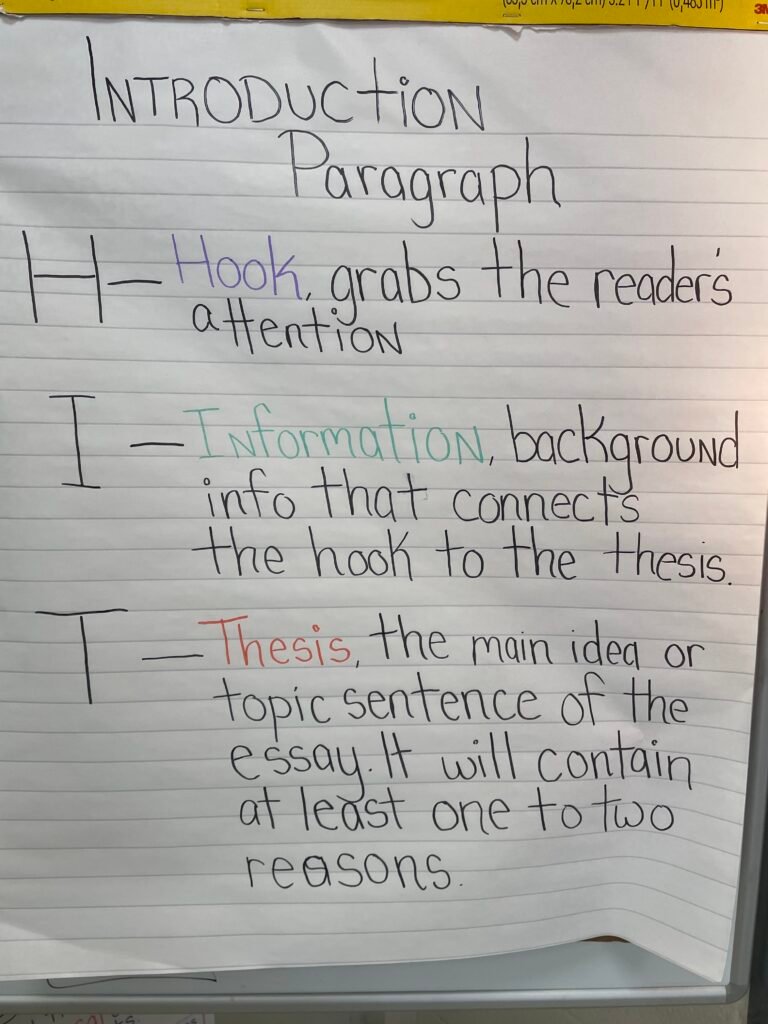
An anchor chart is a poster that focuses your learning on a particular subject. Usually this is a giant sticky note with definitions, illustrations, and examples on a specific topic. They’re called anchor charts because they help to “anchor” your learning like a ship’s anchor keeps it steady in a rough sea.
Of course, an anchor chart doesn’t have to show only learning-related materials. It’s also useful to have one for classroom expectations, especially if this is a requirement by admin. I have a few that show test-taking strategies as well. Basically, an anchor chart should help your students in some way. You also want it to be big enough so that students can see it from all over your classroom.
Materials Needed to Make an Anchor Chart
You don’t need much when starting out with how to make an anchor chart. But you will be able to make better charts with a few key items.
- Giant Sticky Notes – I use 25 x 30″ sticky notes like these. I don’t buy them myself however, my school provides them for me. Tbf, I think it’s the title one money at work.
- Colorful markers – I prefer Sharpies as the ink stays for years. I like the regular fine point, NOT extra fine. I want the kids to be able to read these after all!
- Yard Stick – if you want to be ‘perfect’ than I recommend a yard stick too. You can center designs, ensure straight lines, etc.
- Color Printer (optional) – I like to print out pictures from time to time to glue onto my anchor charts. This helps create some visual interest. Plus, if the kids like looking at the posters, they’re more likely to use them!.
Finding Inspiration
If you’re just getting started as a teacher, making your own anchor charts can seem intimidating. So where to find inspiration? The first place I recommend is other teachers, preferably those teaching the same subject (and same grade level if possible!) in order to see charts that are the most relevant to your classroom. These teachers know what standards your students need to master, what struggles the kids tend to face, and how to break down more complex terms.
Of course, sometimes you might be the only teacher in your subject or maybe you don’t have that kind of relationship established with other teachers in your building yet. Idk, maybe you just shy and don’t know how to ask “Do you mind if I take a picture of this anchor chart, it’s really cool?”. If anyone asks that, I’m immediately flattered, trust me! But yeah, where do I start out? Pinterest!
Pinterest is a GOLD MINE for anchor chart inspiration. Take a look at my search for “plot anchor charts” here:

Notice anything? The anchor chart I ultimately made (the one at the top of this page), takes a lot of inspiration from these. I basically combined several anchor charts until I had one I was happy with that I knew would go over several of the vocabulary terms, would be visually appealing, and made sense (to me anyway).
I also like Pinterest’s search tools. It has identified that I’m searching for a teaching term and is offering suggestions that could make my search more relevant. I could be more specific and add “6th grade” to my search and that would yield different results from a “3rd grade plot anchor chart”. Like most online resources however, Pinterest leans heavily toward elementary education. That’s not to say secondary resources don’t exist, just that they’re limited.
Then of course, there’s the OG, Teachers Pay Teachers. TPT is not my first stop for anchor charts I’ll admit. I think it’s great for some resources, but I just don’t get why I’d pay $10-$20 for pictures of charts that I’ll end up recreating by hand anyway because my district hates letting us use the print service. However, if free resources just aren’t turning up what you need, it can be a lifesaver.

Like Pinterst, you can narrow your search by grade level, subject, etc. to find exactly what you’re looking for. Most of the top sellers will have reviews, all sellers will have at least one free item you can download to see what their work is like, and a lot of these anchor charts are available as both digital and printable resources.
Getting Started
Now that you’ve looked up designs and know what you want to make, it’s time to get started. Depending on the look of your anchor chart, you might want to make a small reference first. If you haven’t made one before, you might also want to start out by sketching your design in pencil. If you’re a rebel, you just go in with a sharpie at random because you know what you’re doing.
At the beginning of the year, I needed more ‘concept’ based anchor charts with pictures, definitions, and examples. Now that it’s almost Christmas time, my class is getting geared up for our writing unit. All of the anchor charts I want to make are going to be on lined sticky notes and will focus on teaching kids how to write. That means I don’t need to worry about pictures, color is less of an issue, and making sure my letters are the same size is a non-issue.
That said, I still plan these out. If I’m doing a paragraph anchor chart, I write out the chart on my phone first so I know what I’m going to write and I avoid reduce any misspellings. I like to do this on my phone as it’s easy to keep it near me while I write and I can also quickly send it to others if they want to do a similar anchor chart.
If I’m going to make a more visual anchor chart, I usually start with the title. Then I work my way down, adding in images as I go. I will admit I’m one of those artsy fartsy types, so this comes pretty easy to me, but I definitely make mistakes on my charts too. How do you cover them up? Easy, with paper! If I spell something wrong or accidently draw a line in the wrong place, I find the easiest way to cover it up is to cut out a piece of white paper roughly the same size as the mistake and tape it on. It’s usually not very noticeable from a distance. Plus I’m pretty big into sharing with the kids that I make mistakes because sweet Jesus are those kids terrified of doing anything wrong. It helps normalize the idea that not everything is perfect.
I recommend creating your chart on the pad itself. I’ve never had an issue with Sharpies bleeding through the paper. I’ve only used 3M brand paper however, so if you’re using a different brand, please test it out first!
Displaying Your Anchor Charts
Once you’re done with your chart, the next step in how to make an anchor chart is to display it. At the beginning of the year, I set up one of my bulletin boards just for this purpose. I can comfortably fit 3 anchor charts in the space, and I rotate them out depending on what we are learning that week. I love doing this on a bulletin board, because if I’m in a rush, I can just pin my new chart on top of the existing chart. Plus, this is much more reusable than using heavy duty tape on the walls.
That said, 3 charts alone is not enough space to display what I want my kids learning in the room. I do have a select few anchor charts tacked up on my walls. My school has pretty standard concrete walls painted stark white. My ‘glue’ of choice is removable mounting putty. This shit is so much better than tape or hot glue or any other method for 2 big reasons. One, it actually sticks up all year, no problem at all. And two, it comes back off pretty easily.
I don’t reuse all of my anchor charts, but once I’ve nailed down a design and the examples, I do feel like why the hell would I do this all over again if I don’t have to? I want to easily be able to take these off during testing time and store them for the next year. Luckily Pinterest has the answer.
How to Store Anchor Charts
I was browsing Pinterest this summer and found the best post ever.

This teacher decided to use pants hangers to store her charts. She clips the charts with the hangers and then hangs the hangers on a rolling hanging rack. If you have a pole or hook somewhere in your room or office, you could adapt it to that, but hanging my charts has been a life saver. They don’t get creased, bent, or discolored hanging safely in my dungeon office. Plus, Target had these rolling hanging racks on sale for like $7 so this was definitely a budget friendly solution as well.
Wrapping Up: How to Make an Anchor Chart
Hopefully some of these ideas inspired you. I’m a big fan of anchor charts as they are a cheap, fun way to brighten up your classroom. It helps provide “evidence” of learning during evaluations and we all know some kids learn better with visuals. Don’t feel like you have to copy an anchor chart exactly. You can always customize these for your own needs. I usually add in examples from the texts that we study in our curriculum to make it easier for my students to understand the concepts. I know not every chart I find online will have “Thank You M’am” or “Orpheus and Eurydice” on it, so I adapt.
Making an anchor chart isn’t that complicated. Plus, a lot of the time, your school can provide you with at least some of the materials you need to make them. If not, these items are great to add to your teacher wish list.